Pertama-tama buat object baru dengan cara : create new project, File > New > Project, C++ > C++Project, beri nama pada project yang akan dibuat. Pilih Executable pada bagian Project Types. Pilih MinGW GCC pada bagian Toolchains dan jangan lupa untuk menghilangkan tanda check yang berada dibawah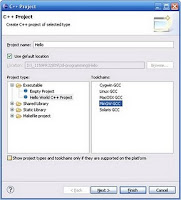
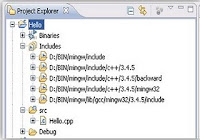
Jika berhasil maka pada bagian Project Explorer akan muncul sebuah hirarki seperti ini:
Selanjutnya kita akan membuat sebuah project aplikasi 3D yang memanfaatkan OGRE. Ulangi langkah 9, lalu pada langkah berikutnya pilih Empty Project dengan Toolchains MinGW.
Lalu klik project yang dibuat pada langkah 13, pada bagian project explorer lalu tekan alt+enter maka Properties akan terbuka. Arahkan kebagian C/C++ Build à Settings, Klik Manage Configurations lalu klik baris Release dan tekan Set Active dan klik OK. Atur Configuration Pull-Down untuk Release atau Debug and di bagian tab Tool Settings masukan opsi-opsi dari table di bawah ini ke bagian yang sesuai. Pastikan yang aktif adalah Release.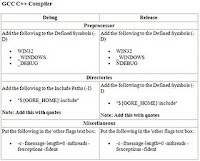
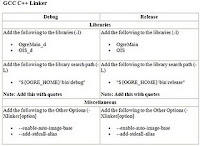
Sekarang masuk kebagian sourcecode untuk melakukan testing. Masukkan sourcecode dibawah ini :
#include "ExampleApplication.h"
class BelajarOgre : public ExampleApplication {
public:
BelajarOgre(){
}
~BelajarOgre(){
}
protected:
void createScene(void){
//mSceneMgr utk manage semua semua yg tampil pd screen
mSceneMgr->setAmbientLight(ColourValue(1,1,1));
//Entity ad objek yg bs dirender discene
Entity *ent1 = mSceneMgr->createEntity("Robot","robot.mesh");
Entity *ent2 = mSceneMgr->createEntity("Robot2","robot.mesh");
SceneNode *node1 = mSceneMgr->getRootSceneNode()->createChildSceneNode("RobotNode");
SceneNode *node2 = mSceneMgr->getRootSceneNode()->createChildSceneNode("RobotNode2", Vector3(50,-100,0));
//attach entity ke scenenode ut beri lokasi render robot
node1->attachObject(ent1);
node2->attachObject(ent2);
}
};
#if OGRE_PLATFORM == OGRE_PLATFORM_WIN32
#define WIN32_LEAN_AND_MEAN
Include "windows.h"
INT WINAPI WinMain(HINSTANCE hInst, HINSTANCE, LPSTR strCmdLine, INT)
#else
int main(int argc, char **argv)
#endif
{
//bikin objek aplikasi
BelajarOgre app;
try {
app.go();
} catch (Exception e) {
#if OGRE_PLATFORM == OGRE_PLATFORM_WIN32
MessageBox(NULL,e.what(),"Terjadi Error!",MB_OK | MB_ICONERROR |MB_TASKMODAL);
#else
fprintf(stderr,"Terjadi Error = %s\n",e.what());
#endif
}
return 0;
}
Build project tersebut, dan masuk kedalam direkori OgreSDK\bin\release lalu buka file resource.cfg maka isinya sbb :
# Resource locations to be added to the 'boostrap' path
# This also contains the minimum you need to use the Ogre example framework
[Bootstrap]
Zip=../../../Media/packs/OgreCore.zip
# Resource locations to be added to the default path
[General]
FileSystem=../../../Media
FileSystem=../../../Media/fonts
FileSystem=../../../Media/materials/programs
FileSystem=../../../Media/materials/scripts
FileSystem=../../../Media/materials/textures
FileSystem=../../../Media/models
FileSystem=../../../Media/overlays
FileSystem=../../../Media/particle
FileSystem=../../../Media/gui
FileSystem=../../../Media/DeferredShadingMedia
Zip=../../../Media/packs/cubemap.zip
Zip=../../../Media/packs/cubemapsJS.zip
Zip=../../../Media/packs/dragon.zip
Zip=../../../Media/packs/fresneldemo.zip
Zip=../../../Media/packs/ogretestmap.zip
Zip=../../../Media/packs/skybox.zip
Ganti bagian ../../../ dengan fullpath lokasi OgreSDK anda dalam hal ini isi resource.cfg milik saya menjadi :
# Resource locations to be added to the 'boostrap' path
# This also contains the minimum you need to use the Ogre example framework
[Bootstrap]
Zip=D:\BIN\OGRE_SDK\OgreSDK\media\packs\OgreCore.zip
# Resource locations to be added to the default path
[General]
FileSystem=D:\BIN\OGRE_SDK\OgreSDK\Media
FileSystem=D:\BIN\OGRE_SDK\OgreSDK\Media\fonts
FileSystem=D:\BIN\OGRE_SDK\OgreSDK\Media\materials\programs
FileSystem=D:\BIN\OGRE_SDK\OgreSDK\Media\materials\scripts
FileSystem=D:\BIN\OGRE_SDK\OgreSDK\Media\materials\textures
FileSystem=D:\BIN\OGRE_SDK\OgreSDK\Media\models
FileSystem=D:\BIN\OGRE_SDK\OgreSDK\Media\overlays
FileSystem=D:\BIN\OGRE_SDK\OgreSDK\Media\particle
FileSystem=D:\BIN\OGRE_SDK\OgreSDK\Media\gui
FileSystem=D:\BIN\OGRE_SDK\OgreSDK\Media\DeferredShadingMedia
Zip=D:\BIN\OGRE_SDK\OgreSDK\media\packs\cubemap.zip
Zip=D:\BIN\OGRE_SDK\OgreSDK\media\packs\cubemapsJS.zip
Zip=D:\BIN\OGRE_SDK\OgreSDK\media\packs\dragon.zip
Zip=D:\BIN\OGRE_SDK\OgreSDK\media\packs\fresneldemo.zip
Zip=D:\BIN\OGRE_SDK\OgreSDK\media\packs\ogretestmap.zip
Zip=D:\BIN\OGRE_SDK\OgreSDK\media\packs\skybox.zip
Savelah file tersebut, lalu copy semua isi direktori OgreSDK\bin\release kedalam workspace project anda khusunya direkori nama_workspace\nama_project\Release, misalkan milk saya 3d-programming\Tutor1\Release.
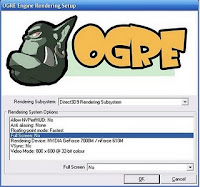
Masuk ke direktori nama_workspace\nama_project\Release, jalankan file executablenya biasanya nama_project.exe maka akan muncul dialog seperti ini,
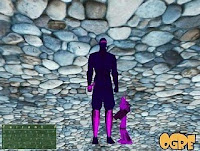
Disini kita mengkonfigurasi output yang ditampilkan, tekan OK, maka hasilnya adalah sebagai berikut:
Referensi:
http://www.scribd.com/doc/51151758/la2
http://iiaahhdudul.blogspot.com/2011/04/pengaplikasian-pada-ogre.html
Labels : wallpapers Mobile Games car body design Hot Deal



0 komentar:
Posting Komentar